Friday 3 December 2010

Texas Jailhouse Chili - Slow-cooker edition

This recipe was found in the probably biggest german cooking community and recipe website, Chefkoch.de. Or, actually, the recipe I based my variation on. Because, as the savvy reader will have guessed, I lacked certain ingredients, and thought others needed to be added. Seriously, chili without fennel seed?
The following is what I made out of this recipe called Texas Jailhouse Chili.

The first photo is at the start of the slow-cooking process, the last of the finished chili. And those in between - yeah, that's right, from in between!


Jailhouse Chile

400 g lean beef cuts
400 pork minced meat
1 can of tomatoes
2 - 5 cloves of garlic
2 - 5 chilies
2 medium onions

Salt
Pepper
Sweet Paprika
Chili flakes
Cumin
Coriander
Fennel seeds
Majoram
Thyme
Pimento
Unsweetened cocoa powder
BBQ sauce


Start by chopping the onions into fine cubes, and chop the garlic and chili - the measures are a bit fluid, basically from mild (2) to pretty spicy (5).
Heat a frying pan with about 1 tblspoon lard, and cook the onions over medium heat until they turn translucent. Add the pork mince, the garlic and chili, season with salt, pepper, and paprika.
In the meantime, get your slow-cooker ready.
Once the meat has browned a bit, transfer to the slow cooker. Add the can of tomatoes; fill about 1/4 with water to wash out all of the juice, throw into pan to catch all those juices too, and then add to the slow-cooker.
Put another tblspoon of lard into the pan, and fry the beef until it's nicely browned. Add to the slow-cooker.
I used dried majoram and thyme, that's why I crushed them in the mortar together with the pimento corns - about 1 tspoon each, and 6 pimento corns.
Add these and all the other spices, go easy on the salt, as the dish will lose liquid, so you'll want to wait with the final seasoning till it's done. I used about 1/2 to 1 tspoon on pretty much all spices - a little less paprika, a bit more cocoa (a heaped tspoon).
Let simmer on high for about 2 hours, then on low for about 4 more.

Once ready, you can serve with rice or beans or both. Crusty bread works well, too.

Monday 29 November 2010

Fried penne with smoked tofu

This is a pretty typical lunch dish for me. Typical in so far as it's built around some left-over pasta. Add some fresh veggies, a handful of spices, and whatever else takes your fancy, and you have a whole new dish, making use of scraps, saving money and time.


Fried penne with smoked tofu
All measures in this recipe are approximates - it's more to give you the idea than a step-by-step instruction.

1 1/2 cups of pre-cooked penne (Rigatoni, in my case, but pretty much every other pasta will work, too)
1/3 red pepper
1 spring onion
1/2 cup cubed smoked tofu
1 egg
Salt
Pepper
Chili-garlic sauce
Madras curry (I used hot, but mild will work just fine, too)


Heat 1 Tblspoon of veg. oil in a frying pan. Add the cooked pasta, and the veggies. Red pepper and spring onion was what happened to be in my fridge - you can pretty much use whatever you have. Brown onions, broccoli, tomatoes, cabbage ... Keep the green end of the spring onion, cut into rings, to sprinkle over finished dish.
Fry for a couple of minues, until the pasta begins to take some colour. Add the curry, and the chili-garlic sauce. If you're in a more industrious mind than I was, you can of course use fresh chili and garlic. Or fresh garlic and dried chilies ... you get the idea.
When the pasta begins to crisp, and the veggies are done (but still have some "bite"), add the tofu and fry for a few more minutes.
Then add the lightly beaten egg, and keep stirring. A wooden spatula works great - oh, and this can of course be done in a wok, if you're so inclined.
Season with salt and pepper. Serve. I like to put a bottle of ketchup on the table with it, as it goes exceptionally well with this kind of dish. But I do understand if you think that's barbarian, and won't.

Thursday 18 November 2010

Quinoa Salad with lentils

From Kokori's Kitchen

After my visit in Germany, I'm equipped with a MOUNTAIN of marzipan and chocolates. Now, generally speaking, that's A Great Thing(tm), however, if you're fighting your weight like I always do, it means a few less-carb-more-veg meals need to be considered.

And because I had half an avocado left from last night's salad (which accompanied a teensy-tiny portion of mac'n cheese), I decided to make a Quinoa salad for lunch.

Quinoa Salad for 2

1/2 cup quinoa (cook like rice, 1 part quinoa to 2 parts water - I use my microwave rice cooker, but any other method you're comfortable with is fine)
1/2 cup green lentils, cooked (take care not to overcook them, or they'll turn to mush ... 10 - 15 minutes do the trick for me. I also add a pinch of salt, half a tsp of white wine vinegar, a small clove of garlic and one thai chili to the cooking water to give them a bit more taste)

1/4 cucumber, diced
5-8 cherry tomatoes, diced
1/2 yellow onion, diced
1/2 avocado, diced

Dressing:

1 tblspoon chopped parsley
1 tblspoon white wine vinegar
1/2 tblspoon (brown) sugar
1 tblspoon water
2 tblsoons good olive oil (I have the BEST EVAR. Yes, it's that good - a friend gets it from her parents, who make it from the olive trees in their southern french backyard. That's how good it is.)
small clove of garlic (optional)
a pinch of salt
1 tblspoon fish sauce (substitute light soy sauce if you don't want to use it or don't have any)
a few drops of lemon juice

Start by cooking the quinoa and the lentils, so they can cool a bit.
While they're cooking, mix the vinegar, sugar, water, finely chopped garlic, and olive oil.
Dice the cucumber, add to the dressing and sprinkle with salt. Let sit for min. 30 minutes, so the cucumber can "bleed" some of it's water into the dressing. Add diced onion and parsley.
By now, the quinoa and lentils should be cooked and cooled, and the other ingredients nicely chopped up.
Mix all well together, add fish sauce, lemon juice and freshly ground pepper, stir again, and enjoy.

Wednesday 27 October 2010

Home made pasta FTW!


Today I decided I had earned a bit of a reward for all the stress in the last few weeks, and awarded myself a pasta maker. Well, a few other things, too, but none of those produce edibles, so we'll keep quiet about them.

Argos, £16.99 got me the desired machine, and of course I immediately set about to make some pasta. Tortellini was what I wanted, as I have not dared buy any filled pasta since my dairy intolerance was detected. I had unpleasant experiences even with stuff that assured me on the label no dairy whatsoever was involved.

First step - find a pasta dough recipe. Easy enough, although all I found were for like 5 pounds of pasta, and that's a bit much for tiny me. So I made a smaller batch of dough.
I used plain white flour, as the biggest supermarket close to me didn't have the desired 00 grade flour.

2 cups of flour, 2 eggs, half a tspoon of seasalt, a few drops of water gave me something that looked promising.

This went into the fridge for about an hour, and in the meantime I ravaged my fridge for things to make a filling with.
I found:
pancetta cubes
some brown mushrooms
a piece of parmesan
an egg
some old bread I shredded into breadcrumbs (about 1 tablespoon)
a few sprigs of fresh thyme
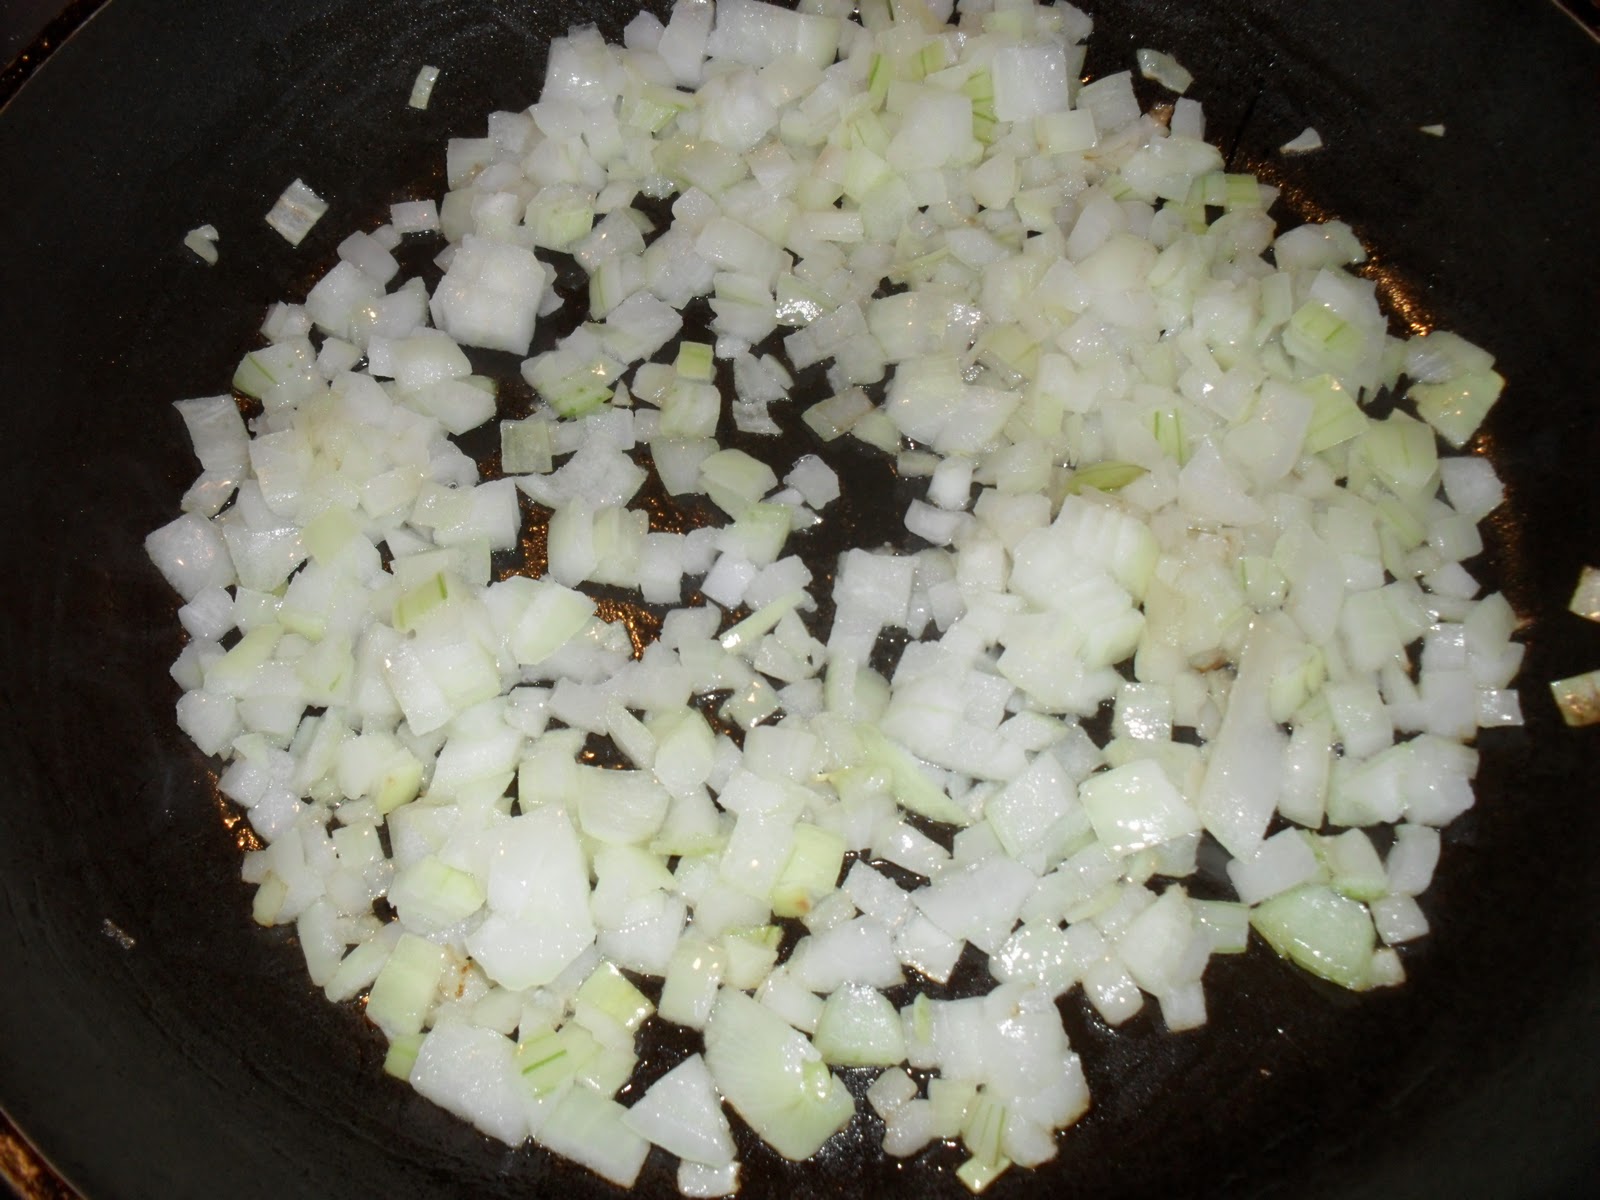
half an onion
a clove of garlic
some dried porcini

I started by soaking the dried porcini in some water, then fried the pancetta in a bit of olive oil, added the onion, cooked that over medium heat till it started to brown a bit, added the mushrooms. When the liquid from the mushrooms had been absorbed, I threw the whole lot into a food processor, added the re-hydrated porcini, the bread crumbs, the coarsely grated parmesan, most of the lightly beaten egg (I kept some to seal the tortellinis), and whizzed it into a moist, but not liquid mousse.

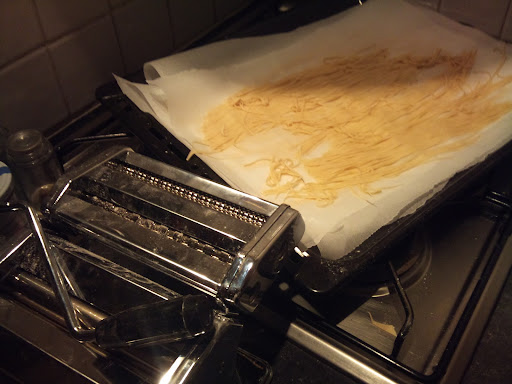
Then I spent the better part of the next hour making about 12 tortellini ...
It's rather time consuming, if not complicated, this pasta making.
Take the dough out of the fridge, and cut off an about golf-ball sized lump.
Run that through the pasta maker on it's widest setting. Fold in half, sprinkle with flour, repeat. And repeat. And repeat - until the dough is elastic, but no longer sticky. At this point it dawned on me that my dough had a bit too much liquid, as I had to repeat these steps ca. 12 times until it was "right".
Once it has the desired consistency, set the machine one step smaller, and run it through. Repeat that until you're at the thinnest possible setting.

You can either make all the plates, and keep them separated by floured baking paper under a teatowel, or you can go batch by batch - I did the latter.

Once you have a plate of pasta dough, put it on a floured work top or wooden cutting board, and cut ca. 2 inch rounds (I used a cookie cutter).
Set about half a teaspoon of filling in the middle (or as much as you can get away while leaving enough space to close them), then smear some egg around the outer edge, fold in half and pinch together. Start in the middle and work your way to the sides, while trying to get any air out without the filling spilling.
Set on a lightly floured plate or tray.
The cut-offs can be kneaded into your next lump.

Once all of your dough and filling are used up (well, I ended up with quite a bit leftover dough when the filling was out, so I made a batch of tagliatelle out of it), you can either cook them right away, or freeze them. To do the latter, put them well apart on a tray and stick that in the freezer till they're frozen solid. Then you can re-pack them in a bit more space-preserving manner.

Cook in salted water for 2 - 5 minutes - they're done when they swim on top.
I just sprinkled mine with some molten soy margarine (butter would have been heavenly, sage butter even better ...) and that was it. They were delicious!

Well worth the hassle, but I'd strongly suggest to make them in batches to freeze. Seriously.

Saturday 25 September 2010

Spaghetti meatballs with preserved lemons

Not surprisingly, I'm always on the lookout for interesting food stuff - new ingredients, spices, and the like. Living in Brighton, there is a great choice around already, however me being the geek I am, online shopping is so much more appealing to me.

So I was pretty thrilled when I discovered Steenberg's online shop - organic fairtrade spices, condiments, baking ingredients and more. I just love it!

Of course I couldn't leave their site without ordering at least a few tiny little jars of spices, and I fully expect to stock my kitchen with a lot more of their offerings.
This time around, however, I restricted myself to Harissa with Rose (still waiting to be tested ... I'm thinking lamb tagine, maybe?), Cayenne Pepper (first used in this mornings breakfast of a tuna-and-tomato wrap), semolina flour (to go into my next bread) and a glass of preserved lemons.

Preserved lemons have been calling out to me for a long time. Having finally acquired a glass of them, I just had to do something with them, and since I'd already settled on Spaghetti with meatballs for today's dinner, that's where they went. Basically, I replaced the capers I'd otherwise have used with one tiny chopped lemon. Which worked GREAT, I'm happy to say.


The idea of this dish is to combine a rather fruity and a bit tangy sauce with the meatballs more on the salty and spicy side, and for me, this worked really well.

Spaghetti with meatballs, lemony version

500g lean beef mince
1 can of chopped tomatoes
a twig of rosemary
1 big clove of garlic
3-4 anchovy fillets
1 medium-hot green chili
1 medium onion
1/2 glass of red wine
1/2 - 1 teaspoon of brown sugar
1 chili (I used a mild-ish sort today)
a good pinch of cayenne pepper
1 very small preserved lemon (mine would have just snugly fit onto a teaspoon)
3-4 dried tomatoes in oil
sea salt
black pepper

Chop up the one half of the onion, the garlic and the chili. Heat olive oil in a skillet, put in the onions and reduce to medium heat. Cook until they start to go tender, add garlic and chili, fry for a another couple of minutes. Pour in the wine, let it cook for a minute or two, then add the tomatoes.
Reduce the heat, and add the finely chopped dried tomatoes and preserved lemon - according to taste, you might want to just use the peel; I went for the whole lemon.
Add the sugar (it should soften the sharpness of the lemon, but you don't want it sweet), salt and pepper.
Let the sauce simmer on low heat for about 30 minutes.

In the meantime, chop the anchovies, half of the garlic, the other half of the onion, and the rosemary very finely and mix with the beef mince. Add salt, cayenne and black pepper to taste. (If you like your meat-balls a bit fluffier, add some bread-crumbs and an egg to the mix; I left this out today). Use a teaspoon to form regular balls, add to the sauce after 30 minutes, put a lid on your pot and let it simmer for another 15 - 20 minutes.

Serve with spaghetti cooked al dente, and grated parmesan.

Tuesday 21 September 2010

Sour dough with Couscous

Yesterday I found myself with about a cup of left-over couscous, and also in need of new bread. So I took my trusted sour dough starter out of the fridge, and while kneading the dough, I decided on a whim I was to do some experimental baking, so I just threw the couscous in ... later on, while the dough sat in the fridge and I couldn't get to sleep because my upstairs neighbours pushed their furniture around, of course I had a few of these half-lucid, half-asleep visions of how that would turn out horribly wrong and I'd be left with no bread - oh horror!


Well, in fact it turned out really nicely, so here's what I did in detail:

Sour dough with Couscous

2 cups of sour dough starter
3 cups of plain white flour
2 teaspoons of sea-salt
1 cup of cooked couscous

If you don't have left-overs, get some pre-cooked couscous and mix 1/2 a cup with about 1 cup of hot chicken stock. Let it soak up all the liquid, taste if it's enough - the couscous should be well hydrated and soft. You might need a bit more than 1 cup of liquid, I found that couscous really varies ...
Prepare your starter by bringing it up to room temperature, then add 3 cups of plain white flour, 2 teaspoons of coarse sea-salt (my current obsession is smoked Maldon sea-salt), and the couscous.
Knead together, put it back into a bowl, cover tightly with cling foil (I secure mine with an elastic band), and stick it into the fridge to let proof overnight.
On the next morning, take it out and let it come to room temperature (schedule at least an hour, better two).
Take the dough out of the bowl, spread on a work surface sprinkled with flour, and stretch into a square, then roll it up.
I used a baking pan, you can do without on a baking sheet covered with baking paper, if you don't have one - either way, oil the form (leave out the oil if you use non-stick baking parchment) and sprinkle with flour, then set the loaf down with the "seam" on the underbelly.
Set a small (heatproof!!) bowl with water on the bottom of the oven and preheat to 220C/440F (don't do that earlier, you want to give the loaf some time to rise again while the oven heats up), cover with the cling film in the meantime.
Once the oven is ready, take a sharp knife and slash once along the "spine", then put the loaf on the middle rack, bake for ca. 45 minutes until it's nicely browned and sounds hollow when you tap it's underside.
Take out and let it cool on a rack, enjoy.

Sunday 12 September 2010

Slow-roast pork belly

Sunday, and I'm feeling reasonably well. It appears it was a good idea to go see a doctor, and to take the antibiotics he gave me. Usually, I'm not a huge fan of antibiotics, especially not for "minor" infections like a cold. But the last cold that behaved like this one was starting to gave me 4 months of fun. Yes - 4 *beep* months. So, as I told the doc, I can't have that again, and if I have to take 52 (!) pills for that, so be it.

Anyhoo, I digress. I have been lusting for slow-roasted pork belly with mash for ages. It's on pretty much every menu in pretty much every place I eat. However, I can't order it, as nobody in their right minds would consider serving mash without butter. And that means, it's off limits for me.

So poor me had to do her own - harsh! 5 GBP get you 2 pounds of pork belly, readily scorched and rolled. That's enough pork belly to feed me for a week, so it'll have to be shared.

Today, I'm going to make it easy for me.

After an hour and a half:


The recipe I worked off is here - I just made a few adjustments.


There are still 4 pounds of apples sitting in my airing cabinet, so I added two chopped apples to the roasting vegetables. Also, I lacked celery, so I left it out. And, last but not least, my Thyme was in need of pruning, but I also had a huge bunch of Rosemary sitting in my fridge, so I cut down the garlic to 2 cloves, added Rosemary and 2 Bay leaves to the handful or so Thyme.


The suggestion is to serve some "nice greens" with it. Well - what can I say? If I want nice greens, that's a whole different dish. So all I served with it was mash. Without butter :(

Saturday 11 September 2010

Thank you, Asda!

Thanks to Asda, I'm now not only drowning in apples, no, I got carrots to keep them company! Huzzah! I guess ...

Well, thankfully, carrots can be deep-frozen quite easily - peel them, cut 'em up, blanch them, freeze them.

But today, they made my low-calorie, low-fat dinner in a lovely soup, with red lentils, orange juice, ginger, chili, and coriander.
This turned out much nicer than I anticipated - I make variations of this soup pretty often, as I'm a bit of a fan of lentils and spicy cream soups ...


Spicy Carrot Soup with orange and coriander


2 medium carrots
1/2 medium onion
1 cup of red lentils
6 cups of broth (or water + chicken stock cube ...)
1 orange
1/2 inch slice of fresh ginger
1 clove of garlic
1 bird-eye chili (or other - I like it really spicy, but obviously that's up to your taste)
1 tablespoon fish sauce

Chop the onion, ginger and garlic - no need to deliberate, as the soup will be blended later!
Heat one tablespoon of vegetable oil in a pot, roast the onion over medium heat until it's getting tender. Add garlic and chili, roast a bit longer and let the garlic take some colour, but don't let it burn.
Add one cup of red lentils, and 6 cups of broth. Bring to a boil.
Peel and cube the carrots, add to the pot. Let simmer for 10 - 15 minutes, or until the carrots and lentils are very tender.
Peel and chop the ginger, and juice the orange. Add to the soup.
In the meantime, finely chop the coriander green.
Get your blender, and blend soup until no chunks are left. Add coriander green and fish sauce (to taste).
Enjoy.

Thursday 9 September 2010

Noodle soup with Wakame


I've always been a bit of a soup girl, and my favorite are clear noodle soups. Sometimes I make them sour, most of the time really spicy, occasionally with meat, often using leftovers.

This one, however, is pretty mild, and full of good, healthy stuff from the seaweed. It's also one you can make solely with stuff from the larder and the freezer, which can come in handy if your fridge is a bit empty.


Noodle soup with wakame (feeds one as a main, or two as a starter)

1/2 l of water
5-6 dried mushrooms (shiitake, if you can get them. If not, porcini will do just fine.)
handful of Wakame
one cup green beans (I used frozen ones)
1 green onion
1 bundle of vermicelli
5-6 prawns
1 dried chili
1 slice of ginger
soysauce, fish sauce
sesame oil (optional)

Bring the water to the boil, add the dried wakame and mushrooms. Turn off the heat and let sit for ca. 30 minutes.
Place the vermicelli in a bowl and cover with boiling water, let sit to soak. This is the base for your broth.
Pour the broth through a sieve, keep the vegetables if you want to use them in the soup (I do). Put the broth back into the pot, add one spoonful of soysauce, and one of fish sauce. Bring to a boil again, add the ginger slice and the chili(whole), add the beans, and let cook for 2-3 minutes.
Turn down the heat and add the frozen prawns. Be careful to not boil anymore as that will make the prawns very hard.
Chop up the seaweed and dried mushrooms and add back to the broth.
Place the drained vermicelli in a bowl, pour the broth over them, add a splash of sesame oil. Sprinkle with the spring onion.

Enjoy.

Sunday 5 September 2010

Apple and Carrot muffins


The apples ... I still want to make some chutney, but having been rather sick over the weekend, that has to wait. Instead, here's a simple apple-and-carrot muffin recipe.

Apple and Carrot muffins
(makes 12)

2 smallish apples
1 medium carrot
2 cups wholemeal wheat flower
1 tablespoon backing powder
1 teaspoon salt
a pinch of nutmeg
1/2 teaspoon allspice
2/3 cup brown sugar
2 eggs
2/3 cup milk
1/4 cup vegetable oil (or melted butter)

Preheat the oven to 180C. Lightly grease a muffin pan.

In a large bowl, sift dry ingredients.
In a separate bowl, beat the eggs, add milk and oil/butter. Mix well. Add to the flour mix and stir in - work quickly and do not overwork, as it will make the muffins hard. Grate in the peeled and cored apples, and the peeled carrot.

Spoon the batter into the muffin pan, fill about 2/3 high.

Bake for approximately 20 minutes, or until golden and baked through. Let the muffins cool in the pan for 5 mins before moving to a wire rack to cool completely.

Thursday 2 September 2010

Pancakes with apples and pancetta

I got a big bag full of apples from a nice friend, so expect apples to play a bit of a main role in next week's menus.
Today, we open the dance with pancake with apples and pancetta. Sounds like a weird combination, but actually the sour-salty-sweet flavours work quite well together. I had this for breakfast after a night out, and it worked well to restore my spirits.
This recipe is for one german pancake the way my grandmother used to make.

Pancakes with apples and pancetta

1 - 2 apples, depending on size
1 spoonful of pancetta cubes
2 spoonfuls of flour
1 spoon of brown sugar
1 egg
milk
a spritz of sparkly water (optional)
dash of allspice
vegetable oil

Peel the apples and cut into thin slices - if you want to stop them from browning, keep them in cold water with a dash of lemon juice.
Mix the flour, sugar and the egg. Add milk until you get a smooth, but runny dough. If desired, replace some of the milk with sparkly water to make the pancake fluffier. Add a dash of allspice.
Heat the pan, add 1 spoon of veg oil, add the pancetta, fry till lightly browned. Pour the pancake dough in (according to my grandma, it should be one huge cake rather than multiple smaller ones, but that's a matter of taste), turn down the heat to middle-ish and place the apple slices on top. Work fast, as the dough sets quickly. Once it's nicely browned on the underside, turn and cook the other side.
All in all, that's about 5 minutes of cooking.

Serve.

Monday 30 August 2010

Scraps!

Life's been busy of late. And complicated. So many decisions to make, opportunities to evaluate, paths to be picked.

No wonder that some of my life's essentials have been a bit neglected as a result. Blogging. Sleeping. Shopping.
So I found myself with a nearly-but-not-quite empty fridge today, lots of overhead police helicopter commotion and no particular interest in going out to do some shopping. I had a little think, and realized I'm set for lunch.


What I had:
- half a cabbage, in not too bad shape
- a pound of ground beef
- fridge-dried chillies
- garlic
- green onions
- onions
- some home-made Teriyaki sauce that was meant for something different, but I'm flexible :)


Sweet cabbage with beef


Finely chop the cabbage into strips of about 3mm width. Peel onion, cut into halves, then one half into quarters. Cut into fine strips, too.
Finely chop garlic and chillie - I used one dried red thai chillie pod, but of course, this is totally up to you. Use more, leave it out ... everything goes.
Heat up a wok, add a spoonful of oil, fry the cabbage and onions for about 3 minutes, until the cabbage goes a bit soft and picks up some colour.
Add the meat, a pinch of salt, the garlic and chillies. Fry for another 3 - 5 minutes, until all the juices have cooked away.
Add about 1/2 cup of teriyaki sauce. You can use any you like, I'll give you the recipe for mine, too, in case you want to make your own. Sprinkle with chopped spring onions.

Serve over rice.

Tuesday 10 August 2010

Quick tip of the day: Cosmetics abuse

Well, okay, so this is not *really* about abusing cosmetics; it's about re-purposing some cosmetics containers.


This is a little plastic bottle I purchased in Primark half a year or so ago. It's meant to be used as travel bottle of shampoo/body lotion/whatever-liquid-ointment, really.

Since I like eating fresh greens, and I dislike ready-made salad dressings (too sweet, too sour, too yuck, too ... you name it, I've had all!) but I do love the convenience of shake-pour-eat, this is my take on convenience food made at home.

How to? You don't really need that, do you? Well, okay then:

You need:
- a bottle with a big enough mouth to easily fill in oil and vinegar
- 1 part vinegar
- 3 parts oil
- pinch of salt, pinch of sugar (exact amount depending on the size of the bottle)

Just throw all ingredients in the bottle, shake and pour.

Alternatively, next time you make your favorite salad dressing, make more, fill it into a bottle of your choice, keep in the fridge.
How long this mixture keeps pretty much depends on what you put in there. Oil and vinegar will pretty much outlive you, your children and all of your electronical appliances if you keep it cool. Blue cheese dressings ... not so much. Use within 3 days.

And what's that in my picture? It surely can't be salad dressing, with this colour? As it happens, it is - I flavoured some white vinegar with raspberries the other day, which turned it nicely pink, which mixed with olive oil turned orange. Weirdness, I know.

Sunday 1 August 2010

Final stitches

From Drop Box


Getting ready to put the finishing touches on the first knitting project in years, and actually the first cardigan I ever made.

And ... it's done!

From Drop Box

Thursday 29 July 2010

Black halibut and runner beans


That wasn't my lunch, nor is the guy family or even known to me. He does stand next to a species of black halibut, and that's what I had for lunch today.
I had no idea how huge these fish could be!!

Black halibut filet with runner beans

2 halibut filets (I actually got one and cut it in two, as it was too large to be one portion)
a teaspoon or so of lemon juice
some plain flour

500 gr of runner beans
2 plum tomatoes
1 rasher of streaky smoked bacon
1 clove of garlic

a few black olives (optional)
1/2 teaspoon of capers (optional)
salt, pepper, dried chili flakes
olive oil, vegetable oil (optional addition: butter)
some fresh thyme and rosemary

Cut the runner beans into 1 inch pieces, and cook in salted water for about 5 mins or until tender, but still with a "bite". Dry through a colander.
Heat a bit olive oil, add chopped bacon and garlic, brown over medium heat. Cut the tomatoes into 1/4 inch cubes and add, cook till they are soft and slightly falling apart. Add the beans back in, season to taste with salt and pepper. Throw in the herbs, leaves just plucked from the stems.

In the meantime, season the fish with lemon juice, salt and pepper, and roll in flour so both sides are covered.
Put in a hot pan, with a mixture of sunflower oil and butter (or replace butter by olive oil as I do). Fry on medium heat for 3-5 mins each side, depending on how thick the fish is.

And because I don't have a photo of the dish, you get my thyme and chives instead. :D


Monday 26 July 2010

Keyboard ...


This is my awesome keyboard. Yes, I am a geek ... and that's why I'm making you happy with a fuzzy photo of my glowing keyboard - I need to test my new phone! Yay for smart phones.

Friday 23 July 2010

Change. Yeah, that again ...

We've all heard it more times than worth remembering - change is the only constant in life. It's so trivial, and yet so unsettling. Sometimes you crave change, but don't really realize it. The status quo isn't bad, after all, is it? True, the place you find yourself in doesn't enthrall you quite as much anymore as it did a couple of years ago, but hey, think about it - there are much worse places out there, right?

Sometimes you might feel like change is just coming over you like a bloody tsunami. Oy, I just cleaned that carpet!!

Tough luck. Actually, thinking about it, maybe the carpet needs a ... more radical treatment. Maybe cleaning it isn't quite enough.

Not that you'd think any of those philosophical thoughts when faced with your ruined floor. Of course you'd be too busy worrying about practical things.

When you find yourself in such a situation, where fundamental, expensive and tedious change is determining how you see your future, go to the pier. Take a ride. Maybe you don't have "Scream" near you - if you have, it's perfect!
This might not look like much (and no, I'm not in this video, but it's the Brighton ride), however is one of the scariest rides I've ever been in. You're hanging over the sea for a good while, kept in just by the harness, and then it swings down at a rather breathtaking speed.

I'm not joking, and I said it before - nothing but a few seconds of actual fear for your life to put things back into perspective.

What it made me realize is that I actually like being scared - well, maybe that's putting it a bit strongly, but it certainly describes the feeling at the heart of it. Of course I could just say I thrive on challenges, and that would be true, too.

Challenges wouldn't be challenges if you didn't have something to lose. There's fear right there for you.

So - challenged by coming to terms with change? Find a ride, spend a couple of quid, and I promise, things will look much brighter in a matter of minutes!

Sunday 11 July 2010

Beef Jerky!


It's finally summer, it's been nice and sunny and lovely for days. It's the time for great salads, fresh peas, ripe tomatoes. Light, crisp and - well, summery. But let's face it, beautiful as a well-made summer salad can be, it's not exactly comfort food. As I've been in a bit of a weird mindspace this weekend, I'm very much in need of comfort nibbles.

Also, of course, there's a solar eclipse today. Not that we have a chance of even a glimpse, as it's crossing the South Pacific, but it still feels strangely fitting.


So I decided to give the Sunday roast a pass (well, I did do a couple of duck legs, with a sauce of dried apricots, prunes and tomatoes, with thyme and bay leaf), and instead make the silver-side I had in the fridge into beef jerky.

It came out great, much better than I expected for a first go - slightly sweet, a bit salty and quite peppery. If you don't like your jerky hot, go easy on the pepper and omit the chili.

Beef Jerky

1 pound beef (try to find something as lean as possible, like silver-side)
1 tbspoon brown sugar
3 tbspoon light soy sauce
1 generous dash of Worcestershire sauce
1/2 teaspoon seasalt
1 tbspoon coarsly ground black pepper
(optional chili powder/sauce - I used a chili/lemon mix)

Trim off all "white" stuff - no matter if it's tendons or fat. Then cut the meat into thin slices, about 1/4 inch. You can either do rather long-ish strips and cut them later, or cut the meat into smaller lumps now (I prefer the latter, but it makes the lining on the rack a bit fiddly), either way - cut with, not as usual over the grain. That gives it the desired texture.

Mix all spices in a bowl, mix with the thinly sliced beef, and let sit for an hour or longer.
Arrange the meat strips on your oven rack so that they don't overlap. They can be very close to another as they shrink, but overlapping will glue them together.

Cover your baking sheet in kitchen foil and put it in the lowest position in your oven to catch any drippings. Preheat your oven to 70C/160F, and stick the rack in on the high position. It takes 4 - 8 hours for your beef to dry out, and the oven door should be slightly open all the time to allow the moisture to escape.
It is done when it can just be bend without breaking.

Monday 5 July 2010

Pork Chops with cider and peaches


I was watching "Come dine with me" over the weekend (knitting is the perfect excuse to watch hideous stuff, as one "doesn't really watch"), and there was Gerard, the butcher, doing pork chops in cider. I thought they looked very appealing, and in a rather vague way decided to do some sometime.

Well, what can I tell you? Pork chops were on offer in my supermarket yesterday, so I bought some. As it happens, I have a few cans of cider in the house, too - thank you, Sainsbury delivery man!
I did think about buying apples for a sauce, but already had more fruit than I really needed and didn't want to add to it, so I left the apples where they were and just bought some rosemary and sweet potatoes instead.

I have a bit of an ambivalent relationship with sweet potatoes. In theory, I love them. One of the reasons for loving them is a memory of my best friend's mother. When in secondary school, my best friend was Elena. Her parents were from Spain, having fled the Franco regime to come and live in Germany. Her mother was a fantastic cook, but when she wanted to really spoil herself, she'd have a broiled sweet potatoe.
Most of the times, though, my love for sweet potatoes is theoretical, as I find them too ... well, sweet. But still, I do love them! So I'm on a constant plight to find recipes in which they're done in a way I actually like. Up till yesterday, I had one and a half. Now I've got two and a half, as it turned out that frying and then broiling them in cider is just perfect.

This is what I made them into, and it was GRAND. Easy, too.

Will feed 2 people, goes very well with fresh crusty bread and a leafy salad.

2 pork chops
2 medium sweet potatoes
2 shallots
1 ripe peach
1/2 pint of cider
1 clove garlic
a pinch of chili, salt and pepper
4 twigs of rosemary

Preheat your oven to 200C. Peel and cut the sweet potatoes into about 1/2 inch cubes, the peach into thin slices.
Heat some oil in a pan, fry the sweet potatoes for about 3 - 5 minutes, season with chili, salt and pepper. Take out of the pan, leaving the oil in. Line a small-ish baking sheet with the rosemary, set the sweet potatoe cubes on top and stick it in the oven so they get a bit of a headstart (about 10 minutes).
Season the pork chops with salt and pepper and fry them in the pan, just browning them on the outside, then take them out and set them aside.
Fry the shallots, garlic and peach slices in the pan until they start to brown, pour in the cider and let it boil up for a couple of minutes.
Take the baking tray out of the oven, place the pork chops on it amidst, not on top of, the sweet potatoes. Pour the shallot-peach-cider mixture over them, and put back into the oven for about 10-15 more minutes.
Enjoy.

Inedible! But delicious nonetheless.


This is a piece of lace I made over the weekend. It's also the first piece of knitted lace I ever made.


I'm not totally sure why I never tried lace before. Maybe because I gave up knitting for a long time shortly after my Einstuerzende Neubauten Sweater was finished. Man, I wished I'd have a photo of that one ... it was somewhat famous in my hometown, and many a punk asked me where I'd gotten it. It was (of course!) black, with a neon-yellow Neubauten logo.

Anyhoo. I'm no longer a punkrocker, but I took up the knitting again. And it's real fun, I have to say ... I'm somewhat better at finishing projects now, too (I think). By which I mean, I stopped myself successfully from starting another one before I finish the current one.


You might have seen the buttons I was so happy about on my Facebook wall. If not, here they are again - they go perfectly with what's going to be a cardigan, modelled after my favorite one. The favorite one I bought in H&M about five hundred years ago ... well, okay, so make that 10. But that's still a proud age for a highstreet cardigan, and it's about time the poor thing is allowed to retire. Look at it, how sadly it's drooping and all ...

So the "new version" is slightly different. To begin with, I'm not quite as fond of black as I used to be, so I picked a lighter colour ... I can't quite make up my mind if it's lilac or gray, but I'm rather happy with the in-between-colour-but-not-really-colourful quality of it. Me, weird? C'mon, give me some time to get used to the concept that clothing doesn't have to be black!
Also, because I've been off the needle (ha! Yes, I'll put a fiver in the pun tin. It's worth it.), I didn't want to bother with figuring out how to do the pockets. So the new one won't have any.

Also, and here we're back to the buttons, it'll have no zipper. I'm an arm and a half away from completion. Somehow it's exciting - and I really want to finish it now as I feel ready for more challenging projects. Like, a 1920s inspired lace vest. Or something.

Sunday 4 July 2010

Sour dough - the full monty

This is what my starter looks like after a week in the fridge. Sad. But - don't let it fool you! It's a very lively little starter, this!


With some TLC and flour, it will turn into this lovely brown bread:


This is how the magic is done:

You will need:

2 cups of sour dough starter
2 cups of plain white flour (and some to dust your working space)
2 cups of luke-warm water
3 cups of strong, brown flour
salt

Take the starter out of the fridge. If it's separated (don't panic, that's perfectly normal, the watery layer on top is the so-called "hooch"), give it a good shake/stir and let it come to room temperature. Then pour it into a bowl, and mix with two cups of plain white flour and 2 cups of tepid water, adding one at a time. Cover with a clean towel or cling film and let it sit for a couple of hours. Once it's starting to show bubbles, it's ready for the next step:


Take off 2 cups of the mixture and put back in the (by now washed and thoroughly drained) container your starter lives in. Pop back in the fridge. This is now good to be ignored for up to a week. Should you not want to make bread after a week, take it out, let it come to room temparature, take off half and mix with one cup of flour and one cup of water ("feed"). Then you can put it back into the fridge. Wash, rinse, repeat weekly. Some bakeries proud themselves by claiming to have used the same starter for more than a hundred years!

Mix in 3 cups of strong, brown bread flour and about 4 pinches (equals roughly half a teaspoon) of salt. I do that using a wooden spoon, and switch to hand-kneading once the dough starts to form a ball. You can of course do this in your kitchen aid ... anyhoo, the dough's ready when it's just stopped being sticky, but is still pretty soft. Like this:

Cover tightly with cling film and put in the fridge overnight. Well, that is, if you prefer your fresh bread for breakfast ... you can leave it outside for proofing, of course. It will, depending on your starter and the room temperature take 3 - 12 hours for it to go up, it should about double it's size. Test by poking it with a finger - if the dent stays and doesn't pop out again it's done. In the winter, I sometimes stick it in the oven to proof - turn it on for a minute or two, and then off again. It should be just handwarm (press hand against glass panel in the door to test - if it's too hot for your hand, it's too hot for the dough!).

In the morning, take the dough out and let it come to room temperature. Give it a quick knead on a dusted workspace ... if you prefer your bread to be fine-crumbed, knead up to 15 minutes. The less you knead at this stage, the more rustic the bread will be ( read: bigger holes).


Shape into form, and put on baking tray lined with dusted baking parchment. Put a little bowl of water into the oven and preheat the oven to 220C. Let the dough proof one final time (about 30 minutes usually do the trick), then slash with a very sharp knife, and bake for about 40 - 50 minutes, until it's nicely browned and sounds hollow when you tap it's underside.
Done!

Sunday 20 June 2010

Coconut Rice


One thing's been conspicously absent from my blog so far: desserts.
That's not because I don't like them - oh noes! I <3 dessert. But truth be told, all my favorite desserts have one thing in common: cream. Clotted cream, whipped cream, cooked cream ... and cream is the thing my tummy reacts most violently to. I tried. I tried with lactate pills. Which make it somewhat better. But somewhat better is still misery. And solitary confinement ... yes, it really is that bad.
Anyhoo, today I finally had it - I had lovely fresh strawberries, and wanted something pud-like to go with them. That's how this coconut rice came to be.

Coconut rice

1 cup of rice - I prefer short grained for this, but you can pretty much use any rice. Brown rice adds a nice nutty flavour, for example.
1 cup of coconut milk
2-3 cups of almond milk
(optional) vanilla pod or essence, almond essence, honey to taste

I use a microwave rice-cooker for this. The rice goes in there, with the coconut milk and one cup of almond milk, as well as vanilla, almond essence and one tablespoon of honey. Then it goes into the microwave, on 100% for 5 minutes. Take it out, open (very carefully!! You don't want to burn yourself with the steam!) and give it a stir. Add one more cup of liquid, back into the microwave, 50% for another 5 minutes. Take out, stir once more, if needed, add some more liquid. Put in for another 5 minutes on 50%. It should be done now, but rice, microwaves and rice-cookers vary, so taste it and if need be, put it back into the microwave for a another few minutes; the rice should have soaked up all liquid and be cooked throughout but not mushy.
Serve with fresh fruit or compote.

Friday 18 June 2010

Hot and sour soup


I just stumbled about this photo from last week's cooking session. It's a hot and sour soup I made from the leftovers of a roast duck.


Hot and sour soup

Roast duck carcass (chicken or turkey will do fine, too)
Vegetables (I used peas, sweetcorn, mushrooms)
1 chili (or to taste)
2 tablespoons of ketchup
1-2 tablespoons of vinegar (depending on what you use - rice would be authentic, I only had white vine vinegar)
1/2 tablespoon of sugar
1/2 liter of chicken stock
1 egg
corn starch
soy sauce
sesame oil

Pick the left-over meat from the carcass of your roast bird. Bring stock to boil, add meat, chopped chili, ketchup, sugar, soy sauce. Let simmer for a few mins, add vegetables. Beat the egg in a bowl, pour into soup and keep stirring so the egg is well dispersed.
Mix 1 heaped teaspoon of corn starch with cold water, pour in - you might have to use a bit more or less to get the binding right.
Finish off by adding soy sauce to taste and a bit sesame oil.

Thursday 17 June 2010

Wild times


So I've been a bit lazy with my blogging here. And now I can't even post photos as my camera doesn't like the cheapo batteries from the pound shop, and refuses to let me transfer my pics. Ach, well - I'll post them later. Update: Added picture.

What have I been up to? Well, still struggling with my tummy being unreasonable. Some days are fine, others it seems I only need to look at dairy and feel miserable. And frankly, given some developments in other areas of my life, I don't need more misery. No, Sir, thank you, Ma'am.

Which encourages me to give all sorts of dairy a wide berth. My cookery of late included red lentil soup, roast beef topside with porcini risotto, slow-cooked ribs (I don't know what it is, but I often crave ribs as comfort food), home-made pizza, spinach with pineapple and tomato, and stuff I forgot.

Today's recipe will be the red lentil soup - a great starter or light lunch, easy and quick to make, and a good one if all you've got left is the larder and some sad veggies in you fridge!

Red Lentil Soup

1 cup of red lentils
1 medium potato
1 medium to large carrot
1 tablespoon of tomato puree
1 clove of garlic
1 red chili (or chili powder to taste)
1 pound-sized slice of fresh ginger
1/2 ltr of vegetable stock
salt, pepper, coriander, cumin

Bring the stock to a boil, add diced potatoe and carrot, let simmer for about 5 mins, add the garlic, chili and ginger, add lentils, let simmer till the lentils are cooked. Add tomato puree, puree with stick blender or in blender, add spices to taste. You might have to add some more stock. Serve - naan goes very well with it.

Try cooking lemon grass or lime leaves with the stock - don't forget to remove before blending, though. You can add other veggies, such as leek and celery, or leave out the potatoe, or the carrot ... or you can try other lentils, beans, etc. instead

Monday 31 May 2010

What to do with almond pulp??


Week 6 after I decided it's most likely lactose intolerance which made my life a bit miserable of late, and I'm still working out how to deal with the absence of dairy.
Whenever I talk about my lactose intolerance, I find myself saying "well, you know, it's not too bad - I never ate much dairy anyways." Which is true. It's also just half the truth, as I never knew how much dairy products hide in our foodstuffs.
My idea of my dairy intake was simple: I like milk in my tea, as well as in my coffee (yeah, I've gone back to drinking coffee ... but that's a topic for some other day). I prefer cream cheese over butter on my sandwiches. No way can I have pasta without parmesan. I do like a dash of butter on my broiled veggies, and sauteed onions are so much better if it's happened in butter, or at least an oil/butter mixture.
So far, so bad - but none of these are really non-replaceable. Tea and coffee turned out to be the hardest (and easiest, in a way) to complement. Soy milk, oat milk, almond milk - mixed with tea or coffee taste like slightly flour-y water has been added to your caffeinated drink. Yuck. Lacto-free cows milk is the solution.
I haven't found a substitute for cream cheese yet - hummus works occasionally, depending on what you want to put on top of it ... great with tomatoes, cucumber, and roast chicken. Not so much with cold beef, or cheese. Cheese, I hear you screech? Isn't the whole point here to AVOID the cheese? Well, that's the morsel of good news - matured cheese is fine.
However, while experimenting with different milk-substitutes, I found out that I actually quite like almond milk - just not in coffee, thank you very much. It is, however, great with cereal. Or in smoothies. It's also quite expensive.
When I whined about the price of my favorite involving-no-cow's-udder-milk, a friend pointed out it's easy to make it yourself? What? Almond milk? C'mon, sounds like alchemy.
Turns out it IS easy to make, and much cheaper, too - and even better! One slight disadvantage: leftover almond pulp.
Now I'm a bit of a hippie and greenie at heart (I know, it doesn't go so well with my huge flatscreens attached to each of my 3 computers ... nobody's perfect, eh?), and one of my favorite nitpicks is to throw away perfectly good food. Or stuff that could easily be turned into perfectly good food - just like almond pulp.
Which, as it turns out, can be easily dried (stick into oven on very low heat, and leave till dry - or if you have one, use a dehydrator) and ground again into almond flour.
Some of which I happened to have handy today to make use of a couple of overripe pears.

So, here we go - Almond flour and pear muffins.
Makes 6 muffins.

1 cup of almond flour
1 teaspoon of baking soda
1/8 teaspoon (or a good pinch) of salt
4 tablespoons of vegetable oil
1 egg
3 tablespoons of light brown sugar
1 drop of vanilla extract (or to taste)
2 ripe pears

Preheat oven to 180 degrees C.
Mix all dry ingredients together, then add wet ingredients and mix thoroughly. The almond flour doesn't require the 'haste' usually asked for in muffin dough whipping. Finally, grate the pears in, using the fine grater and leaving the skins on. Alternatively, you can chop them finely - I'm too lazy for that, though.
Depending on the ripeness of your pear, you might find that you have to add more flour.
Fill in muffin forms, about 2/3 high, and bake for ca. 25 minutes.